Introduction
Interactive Text is designed to help you collect actionable, usable data. This Best Practices Guide walks you through the entire lifecycle of a campaign to help you make the most of our platform.
Start with your ultimate survey goal, and work backward.
-
Ultimately,
what decision or action
are you trying to inform or influence?
Examples: near-term local development projects, master plan adoption, school closures, raise attendance at schools, collect demographic info to better understand a particular audience
-
Then,
what types of data or information
would be most insightful for that decision?
What type of data do you want? Examples: preference ranking, support / no support for a certain proposal, idea generation, qualitative stories, contact info
Once your goals are clarified, you’ll know that the campaign will collect valuable input and writing the actual survey content follows easily. Read on for specifics and examples!
Planning Your Outreach
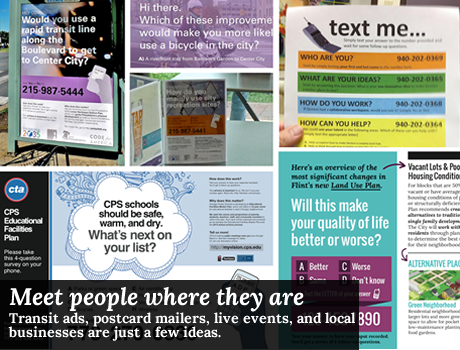
Want New Participants? Meet People Where They Are
Three types of placements invite new participants:
- Laglets: Place signs or ads where people sit, stand still, or generally have their phones out. Examples: transit stops, in-transit ads, cafe table tops, daycare centers, or corner stores. These see steady response rates over the first 4-6 weeks, and often longer. Note: If either ads or people are in motion (e.g. bus wraps, signs at cashiers), there will be limited time to send the initial text.
- Direct Mail: Ask people to respond from a postcard, door-to-door flyer, utility bill insert, windshield or bicycle spoke card, other direct mail. These see a burst of responses over the first 5-7 days.
- Live events: Take the pulse of an event in real-time, or empower an ambassador team to collect feedback in their own communities. See more in Bonus: Using Interactive Text Live.
Already Have Participants?
Send surveys and messages directly to existing participants, and view results in 1 hour or less. See more in Chapter 10: Staying Connected.
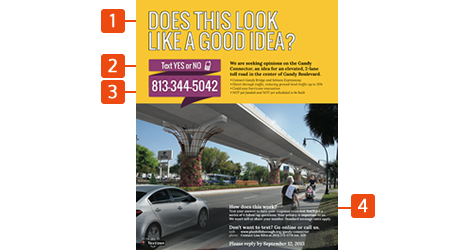
Anatomy of a Great Outreach Poster
Example 1:

Example 2:
Example 3:

- A great hook draws people in. Start with a strong question (see Anatomy of a Survey: The Hook). Then, make the words large and legible. Imagine reading this on a lurching bus or with poor eyesight — it's not uncommon to dedicate 30-50% of poster space to your hook and phone number.
-
Clear and accurate instructions
help people know exactly how to get started. Use one of these prompts, depending on initial question type:
· Text YES to
· Start by texting YES to
· Text YES or NO to
· Text the LETTER of your choice to - Phone number(s) must also be large and legible. Double-check for typos, especially if using multiple numbers for different languages or locations.
- Required legalese. All outreach materials must include the Interactive Text logo and the following text: "Your privacy is important to us. We won’t sell or share your phone number. More info: textizen.com/privacy. Standard text msg rates apply."
Use these Adobe Illustrator templates to get started.
Use Partnerships to Lower Outreach Costs
Partnerships with organizations big and small can multiply the impact of limited budgets.
In Chicago and Philadelphia, we partnered with local transit authorities to place Interactive Text prompts in advertising slots. This allowed residents to see question prompts on their daily commute. At the smaller end of the scale, a neighborhood group can send ambassadors out with prompt cards, or work with a local pizzeria to deliver a flyer with each pizza. Get creative!
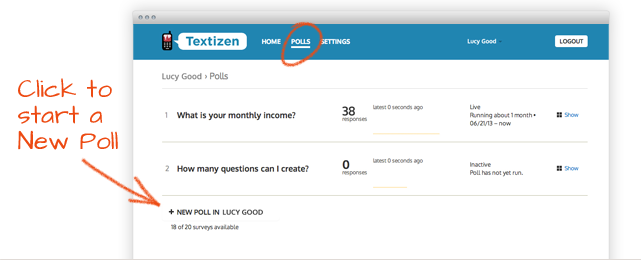
Set Up Your First Survey on the Dashboard
Your polls page is the dashboard for your surveys.
When you log into Textizen.com, you will be immediately sent to your polls page. Here you can set up surveys, pull response data, and see trends in real-time. In the beginning, however, your dashboard is a clean slate in need of a good poll.
Setting up a survey is simple:
- Sign in to your account at textizen.com
- Click “Polls”
- Click “New Poll”
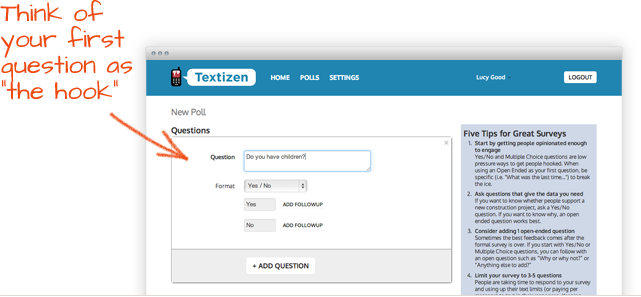
Anatomy of a Survey: The Hook
Your first question plays a big role in the success of your survey.
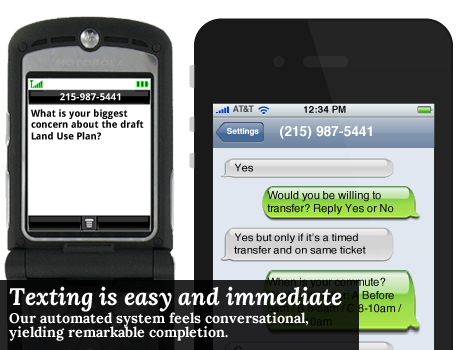
Once people text in to the first question, completion rates are very high: 90% for 3-question surveys, and 50-70% for 5-8 question surveys . In each case, the first question must be compelling! Here’s how to do it:
- Get people interested or emotional enough to respond, either through either the topic or phrasing. Topics such as a new minimum wage or proposed rapid transit line may have broad enough appeal that the question is straightforward. For others, present options that are visually or verbally descriptive; it helps the project feel more real.
- Start with Yes/No or Multiple Choice. These formats make it faster for people to choose their response and type it into their phone. You can ask for more open-ended detail in subsequent questions.
Question examples:


Anatomy of a Survey: The Body
A survey length of 5-8 questions is the sweet spot between convenience for respondents and maximum value for you.
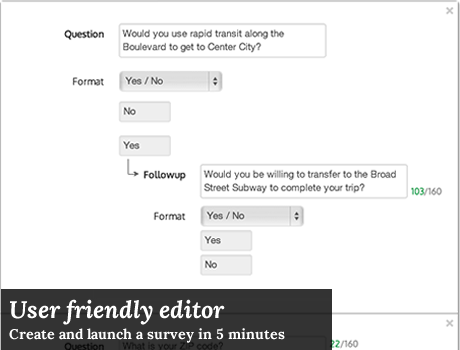
Followup Questions
Followup questions are triggered by a certain Multiple Choice or Yes/No answer.
Question examples:
If yes, then ask:
To create a followup, click the “Followup” button next to the triggering option.
Start-to-finish survey examples
Anatomy of a Survey: Wrap-Up
Consider using 1 or more questions to orient responses by demographic or location.
If you plan to contact these participants in the future, this is your opportunity to ask their permission now.
Demographics
Question examples:
Location
ZIP code is the most commonly used location type. It’s easy for people to answer and it’s clean data to work with afterward. Other location data include neighborhood names and cross streets.
Question examples:
Future Contact
These questions help keep participants updated about changes in the project. You may request addresses or phone numbers to facilitate this dialogue.
Question examples:
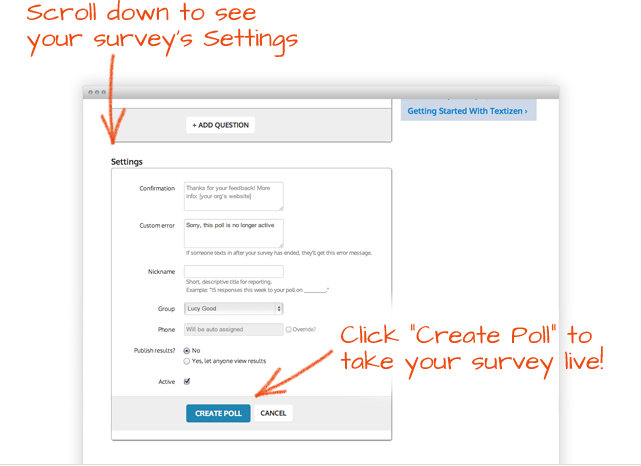
Wrapping Up For Publication
The last leg of survey development before you publish is under “Settings.”
We’ve preloaded simple templates to help you fill out most of the boxes. If you don’t have a website for the confirmation message, consider including other contact info such as phone number or email.
Once you’ve finished filling out the last few options, click “Create Poll” to give your survey life!
Testing Your Survey
When you first create a new survey, the phone number typically takes 5-10 minutes to go live. After that, edits go live immediately.
Some edits, such as changing question type or adding options, will require you to clear all responses before you can save your edits. This is where the “Dangerous” button comes in.
The button labeled “Dangerous” provides three choices:
- End poll: Stop accepting responses. If someone texts in, they’ll receive an error text message which you can customize in Edit Poll > Settings.
- Clear all responses: Deletes all current responses, mostly used while testing and editing your survey. This cannot be undone.
- Trash poll: Delete the poll and all responses. See why we labeled this button Dangerous?
Note that to prevent spam, only one response per phone number is allowed. If you decide to edit the survey and want to try it on the same cell phone, you’ll have to delete past responses first. (“Dangerous” > “Clear all responses”)

Up and Running
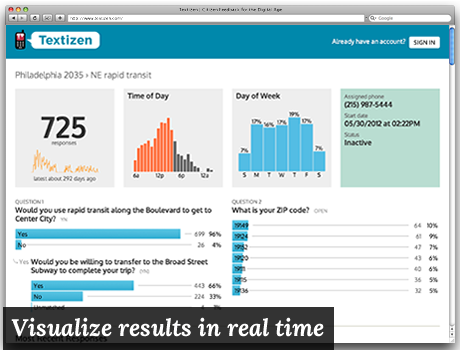
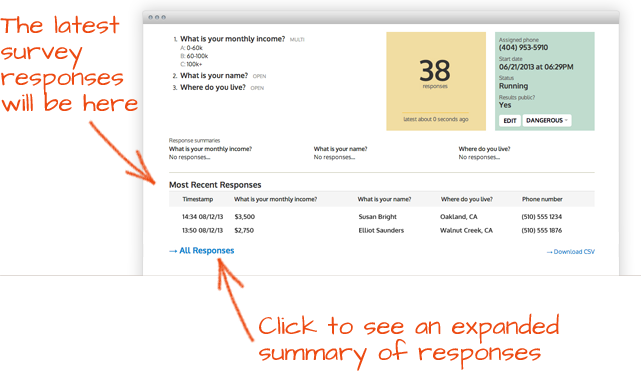
Once the survey is created, responses are displayed instantly on the Polls dashboard.
Click on a poll to see its expanded summary. This includes a breakdown of responses per question, a list of the most recent responses, metadata such as most popular response times, a control panel to administer major changes, and a link to export all data.
You’re done! Now sit back and watch responses roll in over time.
Staying Connected
Use groups and follow-ups to keep your audience involved.
Create a Group
The first step to creating a Group is getting there: Dashboard > Groups > New Group. Give your Group a name. Now, you can start adding participants via 1 of 2 methods.
Hint: To send your followups to everyone who has participated in a campaign, use the Everyone group that is created automatically.
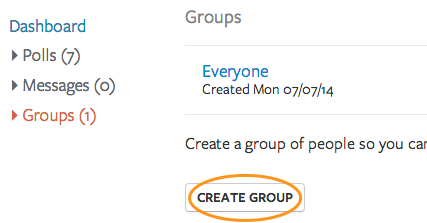
Then start adding people by clicking "Choose from Past Respondents" or "Import a CSV".
Choose from Past Respondents
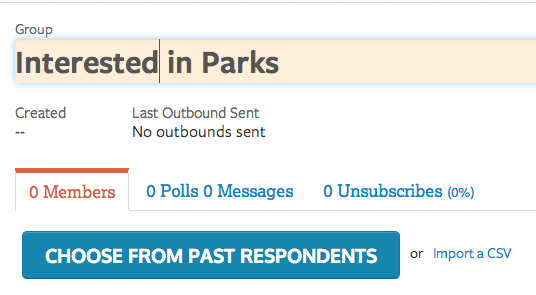
This option allows you to add people who have responded to your previous polls. Select each poll whose respondents you'd like to include. Then click "Submit".
To segment your Group based on their answers to previous polls, click the "Filter" button next to each poll.
Groups are automatically updated to include all future respondents who match your poll and filter criteria. It may take up to 24 hours to add a new respondent.
Import a CSV
This option allows you to import a list of participants and phone numbers.
Followup Polls
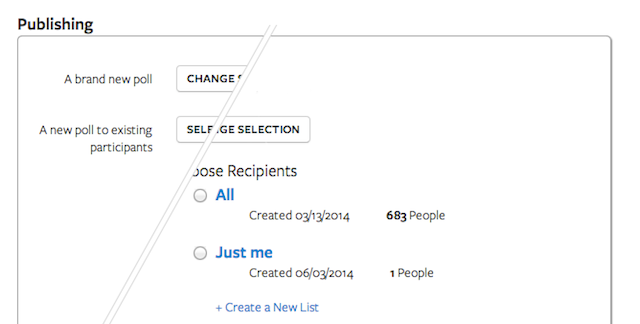
You can now send an outbound poll to your newly created group. Create the poll the usual way: Dashboard > Polls > New Poll. After entering your content, scroll down to “Publishing” and select “A new poll to existing participants.” Choose your group and you’re all set to reach out to a specific audience with a new poll.
Followup Messages
You can send one-time, one-way followup texts to past respondents who are in a group: Dashboard > Messages > New Message. A new message contains three parts:
- What you want to say and a nickname for the message
- Who you’re sending the message to
- When you want to send it
Note that all times are Eastern. After finishing Step 3, save your Message and it will be sent out automatically at your entered time.
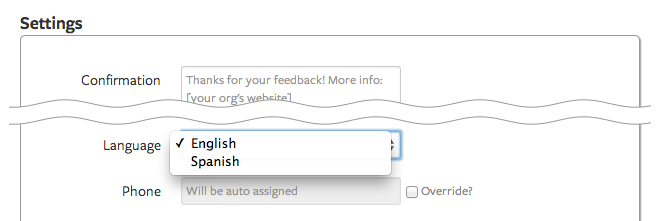
Spanish and Other Languages
Easily write a poll for your Spanish-speaking audience.
Each language of your target audience requires its own poll for the best responses and results. This feature optimizes the answers and analysis of your poll for Spanish in a few short steps:
- Create a new poll and scroll down to “Settings”
- Click on “Language” and choose “Spanish”
- Write your questions in Spanish and you’re good to go!
Once you set up a poll for each of your target languages, we’ll keep them all running smoothly in the background.
We gladly work with partners to enable additional languages — contact us for more details.
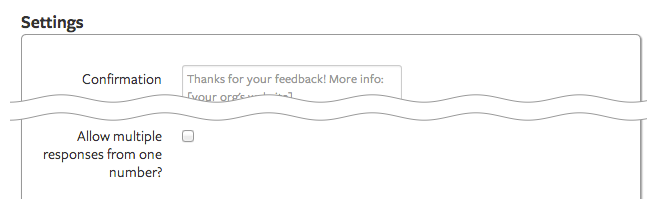
One Phone, Multiple Responses
Use a single phone to collect unlimited responses
By default, Interactive Text accepts only 1 response per phone number to prevent ballot stuffing in public outreach surveys.
You may want to accept multiple responses per phone number when using a single cell phone for issue reporting or as a survey collection device. Have individuals pass it around in groups, use it in lieu of a clipboard, or to overcome concerns of phone anonymity.
Turn on this feature in your poll’s “Settings” section > “Allow multiple responses from one number.”
Using Interactive Text Live
Interactive Text can be used to take the pulse of an event in real-time through one or more of these methods:
- Slide prompt Use our PowerPoint templates to get started.
- Moderator announcement Have the host or moderator announce the survey and take a few minutes to walk participants through it.
- Handouts Given out as people enter the room, these provide something to do while waiting for the formal program to start. Examples: fliers, napkins, cards, stickers.
Want to use responses to guide real-time discussion at your event? See results instantly by refreshing your dashboard.
Need more help? Or have any suggestions on how to make Interactive Text even better for you? Drop us a line at support@granicus.com or 215.720.1636 — we’re always happy to help.


